Bold Black and White Photography Balanced Black and White Art Shapes

The aim of this guide to black and white fine fine art photography is to requite you the tools to create compelling award-winning black and white photography
UPDATED 2022
This guide to black and white fine art photography is a compilation of the almost important principles of blackness and white photography, or the nearly important guidelines for creating monochrome photography, that I created for my photography students and I now gathered into a complete guide to share it with y'all.
These principles are easy to understand and they will take your black and white fine art photography to a new level, whether you work with black and white architecture, black and white landscapes, black and white portraits, or still life. They vest to the full general principles for creating good black and white photographs and practise non depend on the subject affair y'all piece of work with. They will give your black and white photography the extra chemical element that will make it unforgettable for the viewer.
I will be updating this guide to black and white art photography as I observe more than and better means of creating blackness and white fine art photography, so if y'all will consult it in the hereafter you lot may find even more guidelines or ways to produce adept black and white photography. We are all constantly learning, so practice I, and this makes us better artists and helps u.s.a. exist as close as possible to perfection, which is one of the characteristics of fine art photography.
If you'd like to be automatically updated on the changes on this article equally well as on my latest tutorials and articles yous can subscribe to my website and you volition be the first to know when there is new content on this website.
1/ INTRODUCTION TO THE GUIDE TO BLACK AND WHITE FINE ART PHOTOGRAPHY
Creating black and white photography is different from creating color photography and one needs to be aware of the differences in social club to be able to create good black and white photography. This stands especially for black and white fine fine art photography, where the input of the artist is much more important than the subject he is working with, or the reality he is capturing and, by extension, the image the photographic camera captures, which is only the starting bespeak in the creation of the final blackness and white photo. This is ane of the main ideas nosotros are going to focus on in this guide to black and white fine art photography.
Written report Resources – Books and Video Tutorial

Considered "the best book on black and white photography written in the last 40 years" (George DeWolfe), my book From Nuts to Fine Art – Black and White Photography is one of the best resources to study black and white fine art photography. If you own the volume, a practiced starting bespeak is to read Chapter 11: "How to meet in blackness and white" written by myself and Chapter 12: "Rule of Grays" by my co-writer Joel Tjintjelaar. In the book, we become beyond a unproblematic guide to black and white fine art photography and we explain in-depth, in hundreds of pages, which are the principles of black and white photography and what you demand to have in mind when creating your own photographs. The aim is to produce compelling black and white images that are not only a recording of the scene in front end of usa, but can also produce emotion in the viewer's middle. In black and white fine fine art photography, cosmos is not only almost producing good and correctly executed and processed photographs, it is too about producing photography with EMOTION, in other words, producing art photography.
For a more than in-depth analysis of black and white post-processing and of how to come across the shapes and volumes you photograph, how to interpret and return them, also as an add-on to the chapters to a higher place yous tin can read Affiliate 10: "Photography Drawing" that y'all tin partly read as well on my website, where I describe my black and white processing method and this volition brand you lot understand my why I process my images the way I do and what I practically do to make them look like this.
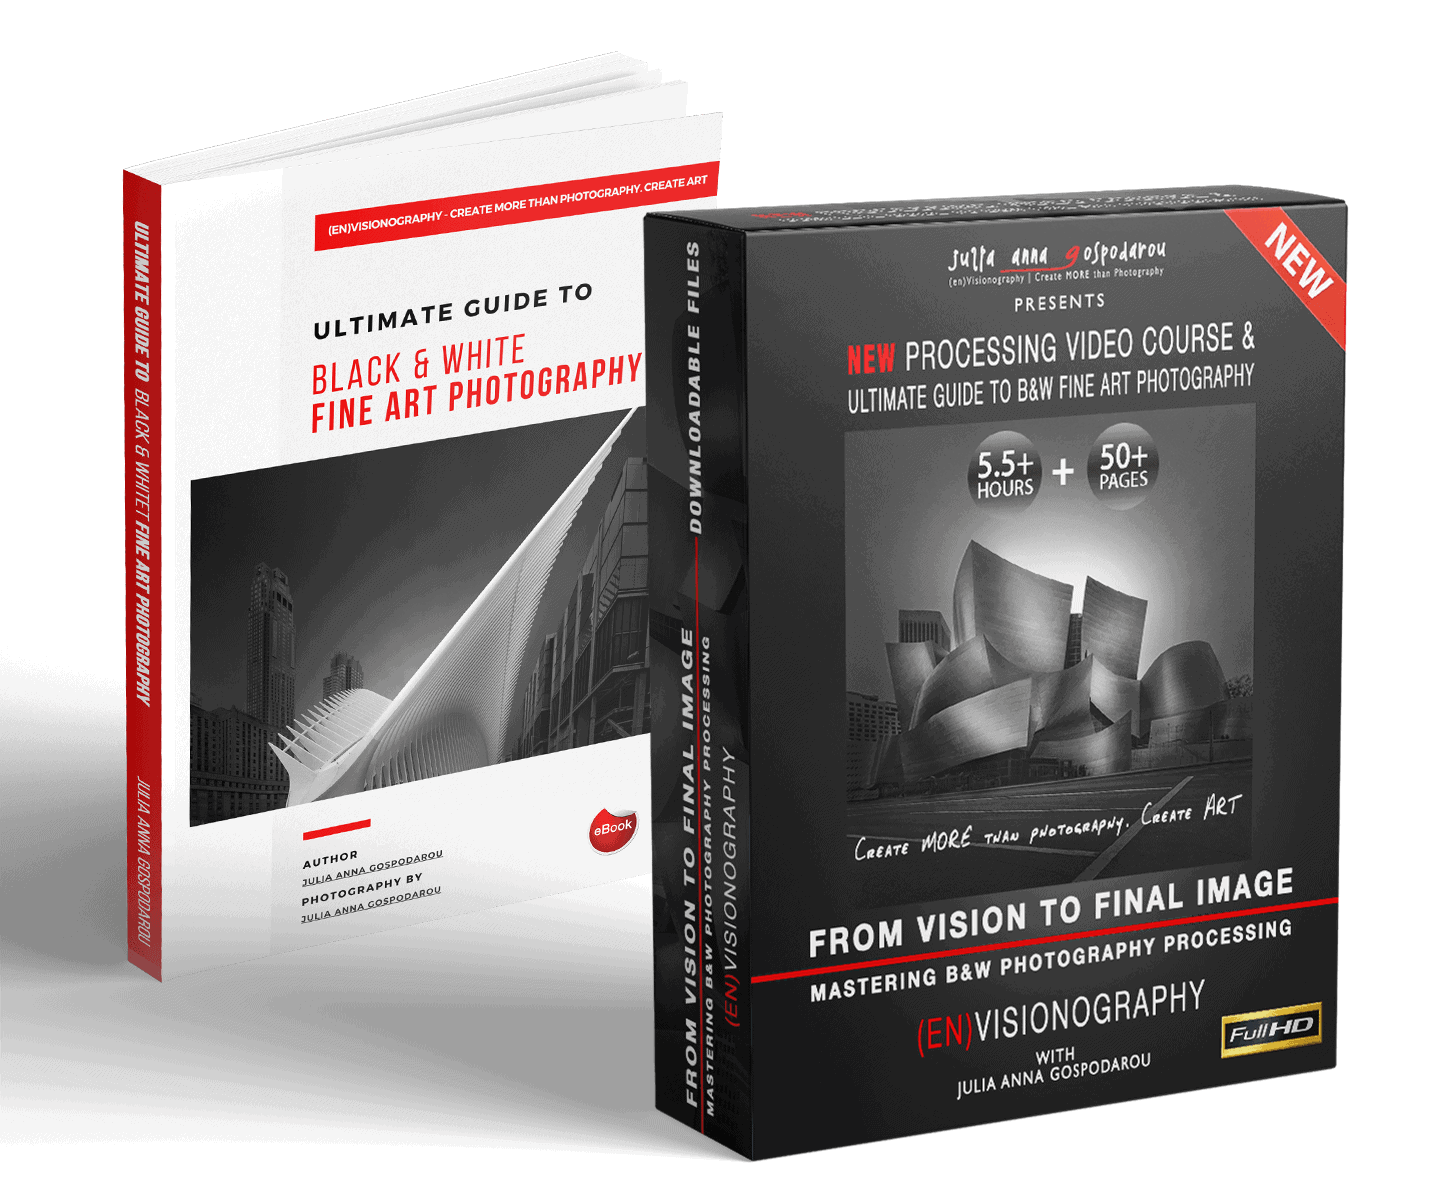
The second practiced resource for studying fine art black and white photography is my video course Mastering Black and White Photography Processing – From Vision to Final Image that comes together with the eBook "Ultimate Guide to Black and White Fine Art Photography", a course that analyses in-depth my personal processing method for creating three-dimensionality in photography that I call Photography Cartoon.

A 3rd practiced resource for studying fine art black and white photography is my video tutorial Long Exposure, Architecture, Fine Fine art Photography – Creating (en)Visionography that is accompanied by the eBook "Advanced Black and White Processing with Photography Drawing" where I present the highlights of my blackness and white processing workflow with my signature method Photography Drawing. The video tutorial drives you through the procedure of creating fine art photography, and (en)Visionography, and analyzes the ways you can express yourselves artistically from a practical point of view.
In add-on to what you tin report in the video tutorial and the two books, I volition tell you a few more than things about what to focus on when working in black and white and particularly black and white fine art photography.
Since we are speaking about long exposure and since this is one of the techniques I apply extensively in my photography, if you lot want to learn more about it, besides watching the video tutorial, you can likewise read my Long Exposure Photography Extensive Tutorial that is a complete guide to this fascinating technique.
2/ VISION IN Blackness AND WHITE FINE Art PHOTOGRAPHY

VISION – THIS IS WHERE IT ALL BEGINS
In art photography, everything starts in your mind. Information technology doesn't starting time in the outside world, simply inside yourself, in your listen and soul. Therefore, you need to take a "black and white mind" and a "blackness and white soul", in the figurative sense of the word, of course – so you tin express your vision in black and white.
Of course, you need vision to create whatsoever kind of fine art photography, just creating black and white photography ways expressing your vision with the specific tools that make a black and white paradigm possible, which develop around light and the shades of greyness.
What does this mean?
This means many things, among which the ability to get deeper in your artistic work and access the essence of things, in society to recognize what is important in what you lot photograph and what needs to be emphasized. Yous do that because you demand to discover your subject, to recognize information technology, to recognize your internal idea in the external world. This is how you will know which scene, subject, point of view, light conditions will be the best raw material you can utilize to recreate your vision in a black and white photograph.
In black and white photography, you need to " encounter in black and white" This doesn't mean simply seeing how the color scene in front end of y'all will look in blackness and white, in terms of gray tones equivalents it in term of contrast, every bit it has been many times suggested as a way of seeing and creating blackness and white photography. "Seeing in blackness and white" means being able to see how the scene in front of you volition recreate your vision. It means deciding what to cull and capture out of that specific scene. It means beingness able to create the best ground for your processing work when capturing a subject, then the idea in your heed, your story, can be faithfully and clearly conveyed to the viewer.
If y'all want to notice out more about what I mean when I talk most vision existence the primordial element when creating blackness and white photography, except for consulting this guide to black and white fine fine art photography, y'all can also read Chapter six – "The Guide to Vision" in my book From Basics to Fine Art – Black and White Photography, that I mentioned previously, Y'all can as well consult a more concise version of this guide on my website.
The Guide to Vision was created based on my long experience as a lensman, builder, and visual artist, and on studying the best examples of expressing your vision in art and photography.
3/ EMOTION As THE FIRST ARTISTIC TOOL IN Black AND WHITE FINE Art
When working in black and white y'all accept to be curious and aim to unveil the hidden side of the earth, the side that exists beyond color and beyond objective reality. You demand to be assuming plenty to work with a very fragile material: your emotions and the emotions of the viewer.
Black and white fine art photography is not almost rigid rules and stiff techniques, it is not about gear or perfect conditions. Black and white fine fine art photography is about provoking emotion, about making the viewer's soul vibrate at the view of the masterfully handled gray tones in your image, information technology is most recreating the world by using symbols and these symbols are the 256 shades of gray in your black and white photographs.
By reducing a color image that has millions of hues of color to a black and white prototype with only 256 shades of gray, you aim to reduce the earth to its essence, to its primordial force. That strength overpowers everything and makes the earth become around. That force is EMOTION , equally the cloth manifestation of LOVE .
iv/ LIGHT IN BLACK AND WHITE PHOTOGRAPHY

"Let there be light…"
I'thousand sure everyone knows this quote from the Bible. For me, this quote says it in the clearest way, regardless of what each ane of us believes spiritually, how important calorie-free is.
Kickoff, there was light, then anything else.
First, there was low-cal, and then photography.
What we essentially do in black and white photography is to work with low-cal and shadow. My Photography Drawing processing method (PhtD) is based on how to utilise light and shadow to render a scene, how to "draw a photograph" in order to create the paradigm we envisioned and induce emotion in the viewer. If you are non familiar with this method, you tin find more than details in my book From Basics to Fine Fine art advertisement on my website.
Keep in listen that the offset thing nosotros are interested in, in blackness and white photography, is low-cal. Not colour, contrast or anything else. l
Light is the offset thing our eyes are drawn to, from the moment nosotros are built-in.
it is the stimulus to which our senses react nigh naturally and spontaneously.
when we know this fact nosotros can use it in our photography to improve the fashion we communicate.
What we are interested in when creating black and white photography, is the light and all its gradations, the light that we capture and then emphasize or even recreate in our images through post-processing. Lite is what reveals the world to us, it is the very prerequisite of seeing and it is what makes photography possible. Light is everywhere and this is why most of the time we don't fifty-fifty think about it. Nosotros simply notice it when it is different than usual, more cute or special, more extreme, or more dramatic than normal. But when working in black and white we should always be careful and detect the light we take in front of usa, regardless if information technology is a special lite or plain common lite. We have to observe it, read it, interpret it, and so strive to apply its full potential to create the image.
Light is the pencil that will draw on paper the photograph we create in our mind, both the light we run into in front of us and the calorie-free we create through postal service-processing.
5/ LIGHT AND SHADOW, AND THEIR IMPORTANCE WHEN WORKING IN Black AND WHITE

The opposite of lite is shadow
Shadow cannot exist without light, it is its analogue, its completion and opposite. Light and shadow are like yin and yang and they should e'er exist seen, analyzed, and interpreted together, both when capturing a black and white photograph, equally well every bit when post-processing a black and white photograph. They are both very powerful tools in our hands as photographers and as (en)Visionographers, that not only capture this calorie-free and shadow, merely besides re-interpret information technology then to be able to give nativity to something more than than just photography, to (en)Visionography and the manifestation of our vision through the image nosotros create.
Light and shadow are our most powerful allies in creating black and white art photography because they are the ground of photography in general, they are what allows us to run across in the outset place, they are the outset affair we encounter in our life then we are the most sensitive to them and able to react to the emotion they can create.
By using calorie-free and shadow wisely we can recreate whatsoever emotion, in any intensity.
half dozen/ THE GRADATIONS OF LIGHT

This topic couldn't be missing from this guide to black and white fine art photography, since light is paramount in black and white photography.
When taking photographs with the intention to piece of work on them in black and white, try to look at the world around you lot in a unlike manner and start with observing the variations of light on a surface, the way it transforms from light to shadow, from bright to nighttime, by transiting all the shades of gray in-between. Discover all the gradations information technology creates and how smooth or harsh this transition is, depending on the intensity of the light falling on that surface. The gradations in the gray tones volition be steeper in the example the low-cal is harsher, creating higher contrast, and smoother in the case the lite is softer, creating lower dissimilarity.
The gradations of light are what volition create depth in the image and brand information technology look iii-dimensional.
The gradations of light already exist around the states in the scene we photograph, but it is even more than important to create them when processing the image, because they are what will make our image believable and permit the viewer to run across a 3-dimensional earth in the photo.
7/ CREATING CONTRAST IN Black AND WHITE PHOTOGRAPHY

Try to identify a black surface next to a white surface and y'all will run into how powerful the contrast betwixt them will be. It will attract the eye immediately and will make you look instantly at the area where the two surfaces meet. It will magnetize your eyes and hold you "captive", looking at how these extremes of low-cal interact with each other, until the moment you can detect enough power to motility your eyes from the point where they meet. And even if you manage to gratuitous your eyes from this "captivity", yous volition withal feel dizzy before you adapt to normal tones and intensities.
Now think about it, and tell me if this is not 1 of the virtually powerful tools y'all tin use to attract the viewer into your photograph and then you lot can keep them there as long as you need to tell them your story. It about seems like a trick, like a manipulation; this is how powerful contrast can be in a blackness and white photo. Because of its power, merely like any other powerful tool, it should be used with measure out and smartly. Nosotros don't want to overwhelm the viewer, to shock them, nosotros desire to seduce them and invite them to observe out more about our image.
If you replace the white with brilliant tones, and the back with nighttime tones, yous will soften the effect, making it less aggressive, but you lot will even so keep intact the power the contrast has.
Using contrast wisely, placing information technology in the right corporeality in the right places is something all famous black and white photographers have understood and used in their work and this is ane of the reasons their work is and so hitting.
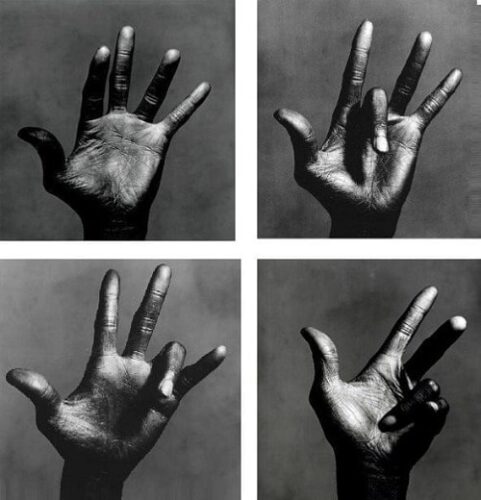
There are many photographers whose work I could bring as an example of how to use contrast, but I can't help merely call up of Miles' Davis black and white portraits and easily however life photos by Irving Penn when I remember of a genius use of contrast. You have to run across these photographs in large to fully understand their power, simply you tin become an thought from the images I'grand showing hither likewise.
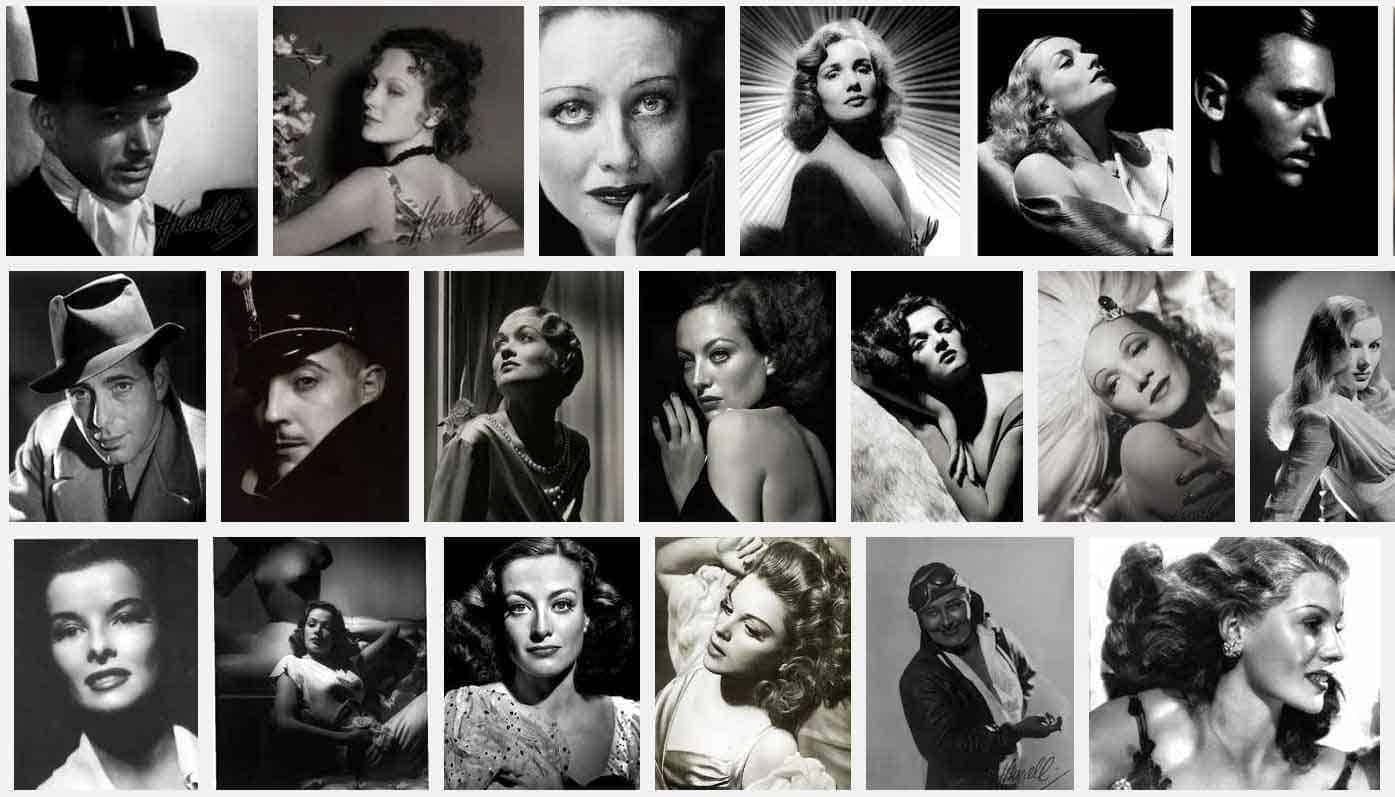
Another adept example of corking use of contrast to create powerful and atmospheric images is the Hollywood glamour portrait work of George Hurrell . Accept a look at his piece of work in the link and you will understand why you like and so much the sometime black and white movies where you can see this type of contrast too.
These are just a few examples of great employ of dissimilarity simply if you search further you will discover many other examples in the piece of work of remarkable photographers that volition go out you fascinated by the intense emotion that dissimilarity can create in a black and white photograph.
8/ COVERING THE Entire TONAL RANGE Between BLACK AND WHITE
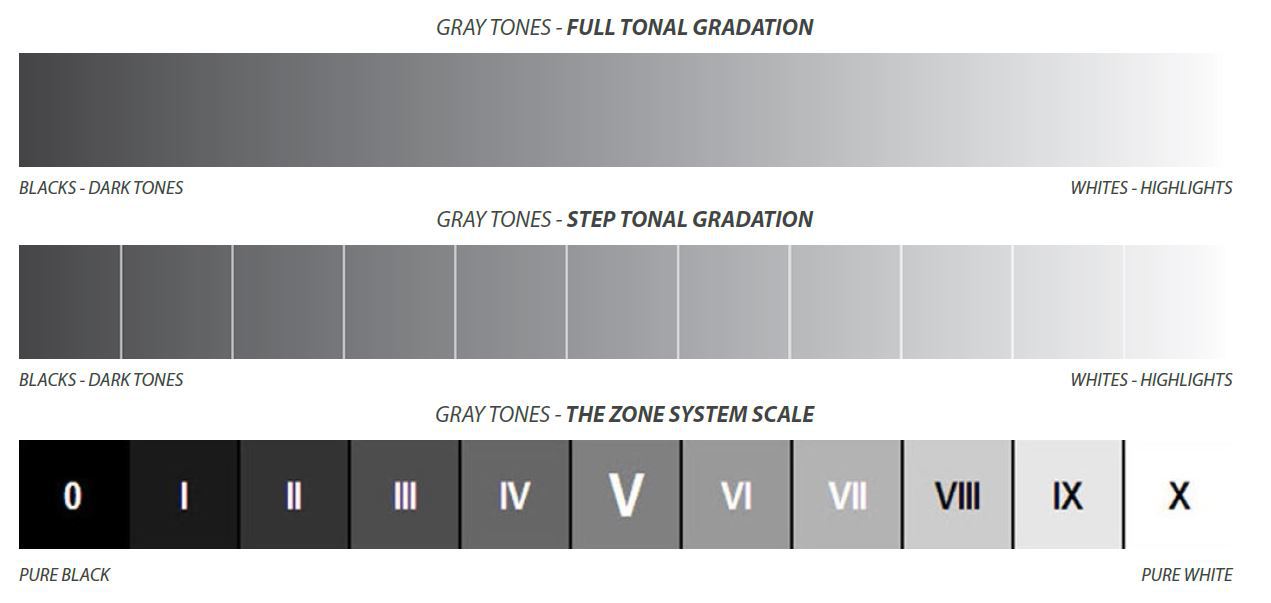
Now that nosotros saw how powerful the contrast tin can be, to draw the attention of the on-lookers let'southward become fifty-fifty further in our mission to seduce the viewer and meet what is the next virtually important thing, once we accept created the right contrast and we take the viewer'southward attention. Next, y'all should fill up the gaps between blackness and white and this is one of the about important principles of black and white photography.
Your goal when processing an image in black and white is to comprehend the entire tonal range betwixt blackness and white , past representing in the image all the in-between gray tones: the mid-grays, every bit they are also called.
You lot need to create images that take the right amount of contrast but also cover the entire tonal range. Contrast is used to depict the attention of the viewer to the image and to the chief subject field, but the mid-grays are what will retain the center of the viewer in the prototype and make them willing to explore the image more. Which shows how important the mid-grays are. You don't demand to take the same amount of each grayness tone, but you need to cover all of them in your image.
You tin recollect about the pure white and pure black tones as the cherry on the cake, while the mid-grays ARE the cake.
nine/ THE RELATION Between CONTRAST AND MID-GRAYS IN Blackness AND WHITE PHOTOGRAPHY

The relation between dissimilarity and mid-gray tones is another topic that couldn't be missing from a consummate guide to black and white fine fine art photography and that any serious black and white photographer should have in mind when creating. Permit me tell y'all here a flake more than near the mid-grays and their relation to contrast, since I've seen that many photographers have difficulty in hit a balance between these two, and this is why this is one of the topics I insist on when I piece of work with my workshop and mentoring students.
Something I take seen frequently existence used as a tool to make the image pop, is the trend to boost the contrast more than information technology is necessary. The problem when yous do this is that the issue will be just an prototype that pops, not an image that keeps y'all there exploring its secrets. Very dark tones, equally well every bit very bright ones, attract the middle because they are stiff, and this is why yous need to have them and besides some touches of pure white and pure blackness, because they are the ones that draw your attention, just it is the mid-grey tones that will tell the story and that, for me, will make a blackness and white photograph brand yous say wow. They are the chemical element that will give you the dreamy look in a blackness and white fine art photograph and make y'all want to know more near the story.
I find the mid-grays, peculiarly the dark mid-grays something that is on i hand very difficult to control well, and on the other hand something that tin be extremely emotional and powerful and will play an of import role in how you will experience about an image.
The dissimilarity attracts yous into the image, but the mid-grays will seduce and continue you lot in that location fascinated, exploring the story. If you run into information technology like this yous will know where yous need to use contrast and where to use mid-grays.
Considering I believe that y'all tin understand best if you see information technology, here are some examples of corking images using mid-grays and dark mid-grays that I collected on Pinterest, then you see what I mean. Look at the beauty of these tones, they are almost touching you physically. I'm sharing with yous iii of my Pinterest galleries with the all-time piece of work by Ansel Adams, Edward Weston and Clyde Butcher, three masters of black and white photography and of the mid-greyness tones.
Ansel Adams
I'm sure you know a lot about Ansel, the undeniable "father: of black and white fine art photography. Here is even more than about Ansel Adams' piece of work on Artsy.
Edward Weston
Another "father" of black and white fine art photography, here is more nigh Edward Weston'due south work on Artsy. I take a special sweetness spot for his nude studies.
Clyde Butcher
Also more than about Clyde Butcher on his website. Clyde is closer in time to our generation, but his work with gray tones is outstanding and his passion for photography is admirable.
And here is where y'all can find a collection of breath-taking images that use mid-grays in the all-time way. It is a sublime pleasure to await at these images. There are some of my images too in this collection and aye, I love to look at these images.
Gray Tones in Blackness and White Photography
Something to look for and continue in mind.
Do no forget the grey tones even when y'all choose to work with very contrasty images or with low-key or high-key images. They will always tell the story more eloquently.
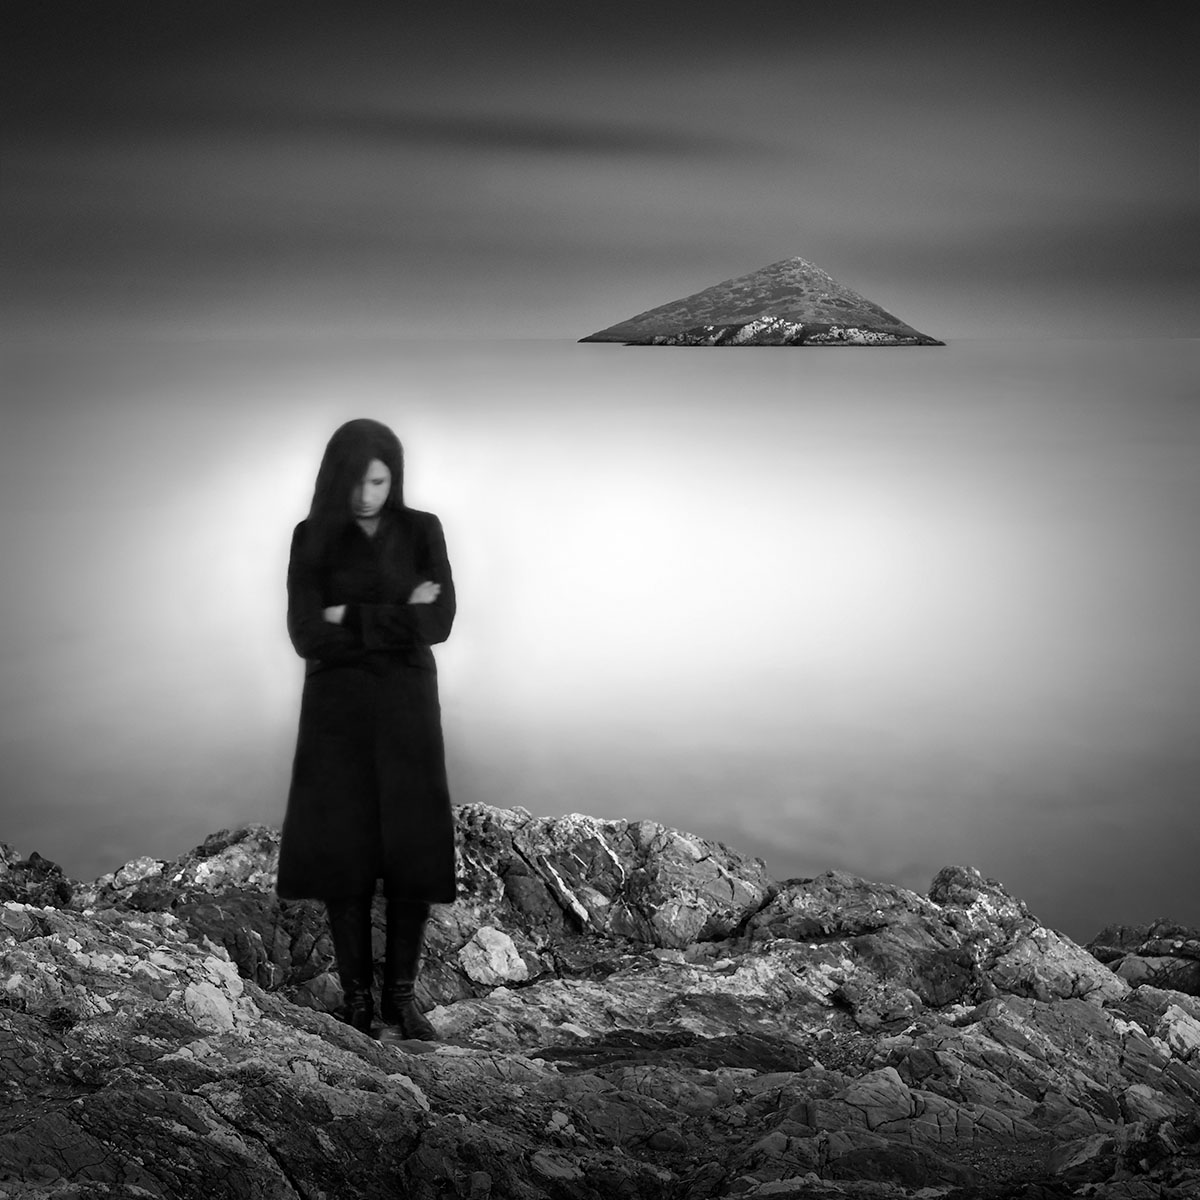
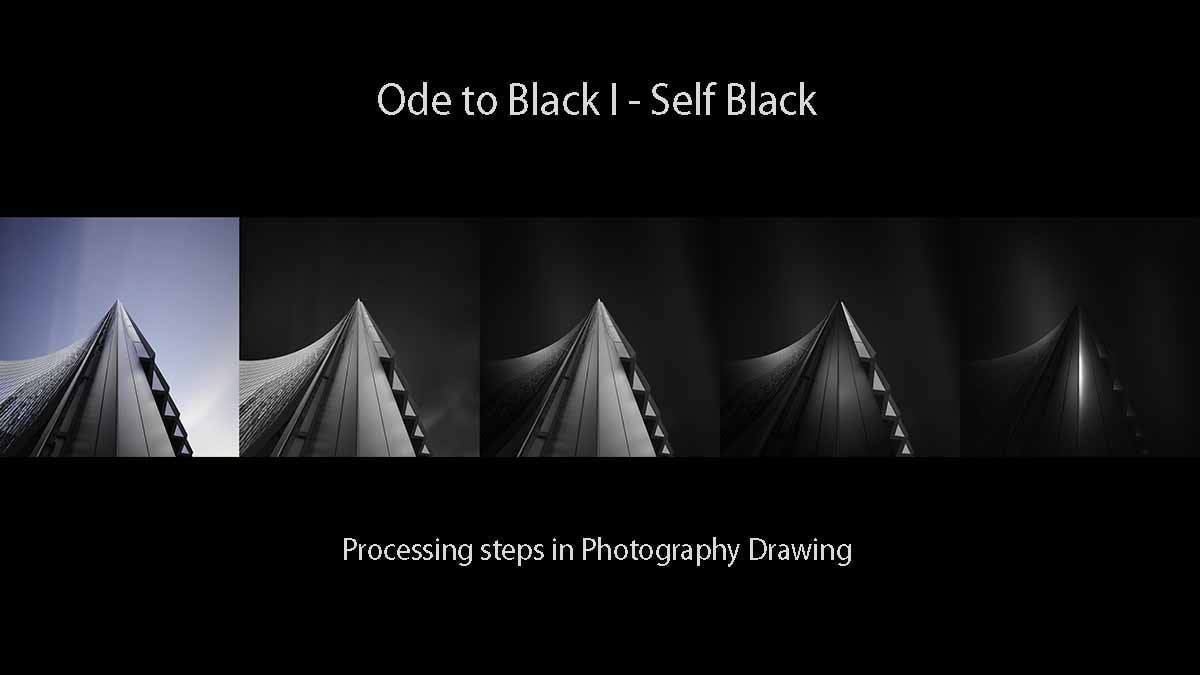
You tin see in my image Ode to Black | Black Promise V – Persona Black below what I mean, that you demand gray tones even if you piece of work with very contrasty and dark images, as I was doing in my series Ode to Black, a series I created during 2012-2013, where I aimed to go every bit far with reducing lite until I touch the limits where photography is not possible anymore.
Fifty-fifty if the grey tones lying in between black and white are in that location in a very small amount, equally in a depression-key or a high-primal image, you still need to cover the unabridged tonal range in your image in order to make the image believable and realistic from the point of view of the light you create in it, and not simply a graphical representation, equally it would become if you simply used high contrast but not plenty filling with gray tones.

10/ HOW TO SHOOT BLACK AND WHITE PHOTOGRAPHY TO COVER THE ENTIRE TONAL RANGE
When you lot shoot with the intention of creating a black and white photo. try to shoot images that will already cover the entire range of grayness tones, even before converting the image to B&W, significant shooting photographs that cover many gradations of light. The all-time moment to capture an image that will cover a large tonal distribution is when the scene you are shooting is not too contrasty. Y'all tin can attain that past shooting on a rather cloudy or a semi-cloudy day, when the sun is filtrated through the clouds. Bright sunlight can make your paradigm seem likewise contrasty and may create intense shadows, which can have every bit a event losing the softness and delicacy the mid-gray tones bring.
xi/ HOW TO EDIT BLACK AND WHITE PHOTOGRAPHY TO COVER THE Unabridged TONAL RANGE

n the phase of post-processing, keep in mind that a very important thing is to use the light yous have to your advantage, either by using it every bit you capture it or by modifying it in post-processing to adjust your goals. The way you change the calorie-free in the image is by using smartly the gradations betwixt black and white – the greyness tones.
You accept to always recollect almost where to utilise a sure gray tone and why – why use that specific tone and not another, why you need that specific intensity, what you want to reach by placing information technology in that area and non somewhere else.
Think that white and bright tones reveal – they assist the eye concentrate on the area where they announced, drawing the attention to them, and black and dark tones conceal – they make the areas where they announced seem less noticeable, thus less important in the hierarchy of the prototype. Apply them both wisely so you tin can guide the centre of the viewer towards the areas of the prototype you consider more important and subdue the areas you don't need to highlight in your story or that are distracting in your prototype (too cluttered, too intense, not related to the subject etc.)
Except for reading this guide to black and white fine art photography, you can also lookout man beneath a video tutorial I created virtually blackness and white fine art post-processing with Photography Drawing and by and large about how to create a black and white fine fine art photo – everything well-nigh the vision, composition and post-processing part of the act of creation in black and white.
Also, you can read the eBook 'Advanced Black and White Processing that comes as a bundle with my video tutorial Long Exposure, Architecture, Fine Fine art Photography – Creating (en)Visionography where I demonstrate my unabridged workflow for processing black and white fine art photography and long exposure photography.
12/ HOW TO USE YOUR SOFTWARE TO CREATE Blackness AND WHITE PHOTOGRAPHY
The more control you have over your image when working in blackness and white, the ameliorate. This means you lot will rely on your software to create your images even more than you will rely on your camera to capture them. You have to exist aware of the ability of this tool: your editing software. Do not exist afraid to use information technology at its full potential.
Controlling the way you lot process an epitome is what will assistance you create fine art photography, in opposition to traditional photography (documentary etc.). The more command you have over the image, the better. You need to have control over the manner you play with light and shadow, the way you lot deal with the balance between them, and over creating the right intensities of lite also as of shadow, in lodge to sustain and emphasize your limerick, and to reveal your subject through enhancing the light on information technology. The more control you take over these elements, the closer y'all will be to recreating your vision about the discipline you chose in the black and white paradigm you produce, the closer y'all volition be to telling your story in a way that volition movement the viewer.
Apply your software not only to convert an paradigm to black and white just to create a black and white photo.
The image you start with may take nix to do with the image yous deliver as a final piece of work. The difference between them has to do with your vision and using the editing software to recreate your vision in the photo you make.
The intention of this guide to black and white art photography is not necessarily to get into details nearly post-processing, I am doing that extensively in my workshops and blackness and white photography courses. Yet, following I volition present to you the most important tools and ideas related to my black and white post-processing so y'all tin can starting time applying these ideas right away.
xiii/ WHAT SOFTWARE TO USE IN Blackness AND WHITE FINE Art PHOTOGRAPHY

The software that will requite you the most control over your images is Photoshop. This is the rex in fine art photography because information technology is such a rich software that will allow you to edit in-depth your prototype. If you combine Photoshop with Lightroom and a few more pieces of software that tin be used equally plugins inside Photoshop or Lightroom, you will have even more than control over your images.
Except for Photoshop and Lightroom., I am likewise using some boosted plugins that work both north Photoshop and Lightroom, as well every bit stand-alone programs. These plugins are Topaz Labs, Luminar, DxO and NIK Software.
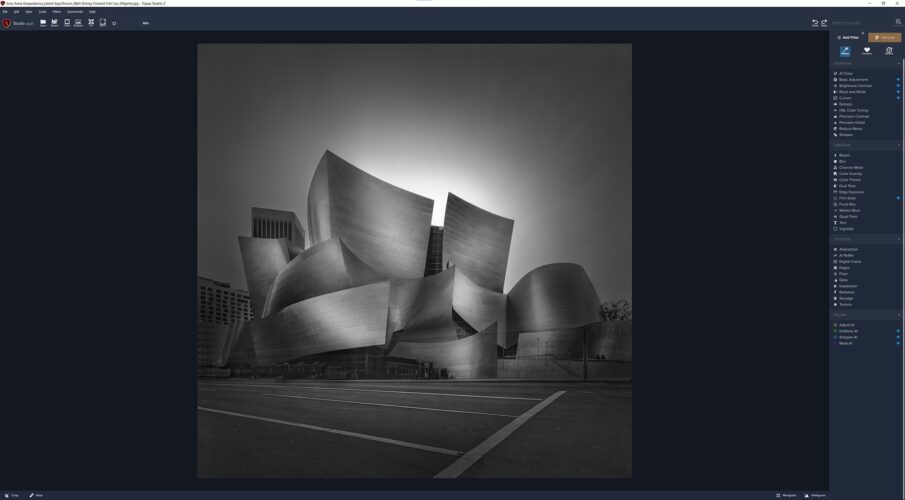
The plugins I apply and recommend for working in black and white photography are mainly the Topaz plugins: Topaz Studio with the integrated sub-plugin/filter for B&West conversion in Studio, and the new Topaz AI Parcel: Topaz Sharpen AI (sharpening, enhancing details), Topaz DeNoise AI (denoising), Topaz Mask AI (creating complex selections and masks), Topaz Gigapixel AI. Topaz has washed a lot these past years to develop some fantastic pieces of software and the new AI plugins they created are but exceptional, which is why I'm using them in each and every image I make. If you make up one's mind to work with the Topaz plugins or if you already piece of work with them and desire to expand your collection, y'all can apply my discount code JULIAG to get 15% discount on any guild made from the links in a higher place.
Another plugin I am using in some cases is Luminar. Luminar has improved very much lately and the new Luminar AI version promises to become a really skillful tool for fine art photography. Just similar with Topaz, you can apply my disbelieve lawmaking JULIAG to get 10% discount on whatsoever order for Luminar made from the link in a higher place.
Except for Topaz and Luminar, DxO is another software I am using with DxO ViewPoint (perspective command) DxO FilmPack (black and white conversion, which has many classic moving picture photography effects), and DxO PhotoLab (sharpening, denoising, detail and clarity enhancing, RAW file enhancing). DxO PhotoLab tin exist used as a stand up-alone awarding or as a plugin in Lightroom. Sometimes I likewise use NIK Silver Efex Pro (black and white conversion) just less frequently and particularly for its Command Points characteristic. Afterward having been acquired by Google some years ago, without getting any improvement after that, NIK is now owned by DxO. They made some changes to improve the plugin but they could do more than so I'm hoping it will be updated and upgraded further.
fourteen/ MY TYPICAL Blackness AND WHITE Art PROCESSING WORKFLOW WITH MY METHOD PHOTOGRAPHY DRAWING™ (PhtD)
1/ My processing workflow starts in Lightroom and DxO PhotoLab where I make the get-go corrections and apply the first enhancements to the RAW file – exposure, general contrast, clarity, grit spots cleaning etc.
2/ Export the image as PSD 16bit file to Photoshop where I crop the image and continue with applying further enhancements to the color paradigm.
.iii/ Correct the perspective by using DxO ViewPoint, specially when working on architectural photographs then decide the framing and cropping.
iv/ Denoise and sharpen the color photograph by using Topaz DeNoise AI and Topaz Sharpen AI.
v/ Create the chief selections by using pick tools in Photoshop together with Topaz Mask AI for more than complex selections. In the example I need to create complex selections or when working with landscape images, I also utilize Luminosity Masks, Channel-based selections, Color hue based selections etc.
6/ Convert the color image to black and white using most of the times the B&W conversion filter (sub-plugin) in Topaz Studio, or sometimes DxO FilmPack depending on the await I'grand after.
7/ Piece of work on sculpting the light by using my processing method Photography Drawing (meet From Basics to Fine Art book and my courses for details). In this phase, I piece of work mainly in Photoshop by using layers (simple layers or adjustment layers), blending modes, gradients, dodge and burn. The way I work on my images is by using selections to utilize the furnishings I desire to create in the image. This is something you can only do in Photoshop, or manly in Photoshop, even if other programs like Lightroom, or Topaz Studio tin can exercise information technology besides to a certain degree. Simply the subtlety of lite that I am after can only be achieved if I use Photoshop every bit the virtually refined processing tool to create the end result.
8/ Use the plugins I mentioned above in Photoshop or every bit stand-solitary applications, as additional tools in different phases of my post-processing, when the effects I can create with them are easier to obtain than by creating them in Photoshop.
15/ CONCLUSION TO THE GUIDE TO Blackness AND WHITE Art PHOTOGRAPHY
After going through all these aspects of creating black and white photography, my communication for the photographer who wants to create this type of photography is to effort to keep in heed all these principles and practical aspects of conceiving, shooting, and processing black and white photography and apply them in creating your own images, not only when working with certain subjects merely by and large throughout your fine art photography work.
It may be difficult in the commencement to encounter the world through a blackness and white prism and to process your photographs in a specific monochrome fashion simply in fourth dimension and if you lot are persistent and piece of work on mastering the techniques for creating black and white photography, information technology volition get 2d nature and it will aid you express your vision in blackness and white in a much more accurate and impressive way. Then you volition exist able to move the viewer and trigger emotion in their middle in the same way y'all were moved when you created your images.
Remember that the goal of black and white photography is to create and transmit emotion and to inspire the viewer to experience the same excitement you felt when creating your art.
I hope you enjoyed this guide to black and white fine art photography and that information technology will give you inspiration and applied tools to create outstanding blackness and white fine art photography.
If yous want to take your craft to the side by side level, I hope to see you soon in one of my workshops or mentoring programs.
You tin can discover more resources about art black and white photography, (en)Visionography, long exposure photography and architecture photography in my extensive collection of photography tutorials. To receive my future tutorials directly via e-mail yous can subscribe to my website.
Source: https://www.juliaannagospodarou.com/complete-guide-black-and-white-fine-art-photography/
0 Response to "Bold Black and White Photography Balanced Black and White Art Shapes"
Post a Comment